Need more information?
Get in touch with Paul Schreuders (CEO)
- +31503162888
- schreuders@xparvision.com
XPAR Vision is a firm believer that the current performance of the glass container industry has not reached its limit. Weight reduction, waste reduction and zero defects production are now possible by using the company’s equipment. In a series of exclusive articles for Glass Worldwide, Paul Schreuders shares the results of implementing the company’s technologies and how they help the glass industry.

As explained in the May/June 2015 (Amazing discoveries…Part one!) and July/August 2015 (Amazing discoveries…Part two!) issue of Glass Worldwide, the GobAssist (GA) monitors essential loading parameters, including:
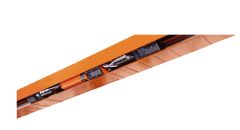
The GA (figure 1) is mounted on a rail system and measures these loading parameters sequentially, section by section. Two high speed cameras capture the trajectory of the gob falling from the deflector into the blank mould. The GA software analyses the many images and gives detailed information about the loading process.

This third article reveals how the loading and more specifically the loading position in the blank mould influences the forming process and bottle quality. Traditionally, the loading position of the gob is determined by the experienced eye of the operator or specialist. The position is controlled by adjusting the deflector. Adjustment of the deflector in the X and Y direction and back in the same way to its original position, reveals that the deflector does not (always) physically return at the
original loading position. Sometimes, extra force by a hammer is used to fix the position! A correct position of the gob is a necessary condition for making good quality products. The GA measures the gob position accurately, section by section and automatically.
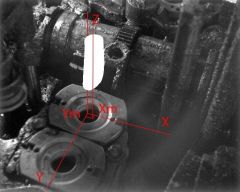
In figure 2, the definition of position is explained. At the top of the blank, it is possible to imagine two axes; the X-axis and the Y-axis. There is also a Z-axis but that is not relevant for position. Every position of the gob has co-ordinates, indicated by two numbers (X,Y). In this respect (0.0) is the centre of the blank mould. For example (4.0) means 4mm to the right; (4.4) means the loading position of the gob is 4mm to the right and 4mm to the inner side of the machine.
The comprehensive and easy-to-navigate user interface of the GA shows the measurements in various combinations. In figure 3a, for example, the timeline of the position (X,Y) is presented.
Cleary shown is that the position of the gob was inside the set limits (green coloured area) and just above the centre. Due to a friction change of the gob in the deflector, the loading position of the gob drifts away from the centre of the blank. In the IR-D control charts (figure 3b) the change of the glass distribution for the same cavity can be seen. The shoulder area gets thinner, the bottom area gets thicker and also the variation level of the glass distribution increases. The position of the gob drifts further away (outside the green area) and at about 12:00, defective bottles are produced (figure 3c). At 13:15, the operator notices the deviation and takes correct remedial action to adjust the loading position back to the centre of the blank; the best position! The glass distribution settles to normal values and more importantly, the variation reduces to a stable and normal level and good bottles are produced again. A loading position of the gob close to the centre of the blank Always results in the lowest glass distribution variation!

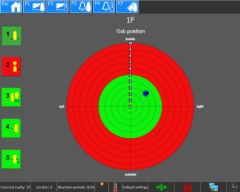
With the GA, it is very easy to adjust the deflector for the optimal loading position of the gob, as shown in figure 4, which presents the ‘gob position’ screen of the GA. The blue dots mark the position of the last gobs. By looking at the GA screen installed on the blank side, the operator can immedeatly see in real-time the result of his action. Restoring the loading position of the gob at the centre has become a fast and easy job that reduces the risk of accidents.
After installation and during training, XPAR Vision consultants perform tests. One of the tests is to show the operators and specialists how easy it is to adjust the loading position of the gob with the GobAssist.The position of the gob is then changed deliberately and the most experienced operator is asked to put the gob at the best position by his/her expercienced eye. Very often seen are deviations of more than 3mm off the real centre, the best at 2mm, taking at least 10 minutes adjustment time! But 2mm is not good enough. With the GA as his aid and by looking at the screen, the operator is able to centre the gob safely within a minute. After many experiments with the gob loading position and glass distribution, it has been concluded that a deviation of more than 1mm has a significant influence on the forming process. This will be explored in greater detail in the next article.
Another example of an uncentered position of the gob and its influence on glass distribution and on critical defects is shown in figure 5. The gob loading position drifts away (figure 5a), the glass distribution starts shifting and the variation increases (figure 5b). This means that not only the vertical glass distribution is changing but also the horizontal or radial glass distribution.
When the loading position of the gob is too far off centre, critical defects will occur (figure 5c). This happens within a few hours and means that when there is no GA at the blank side of the IS machine, the operator has to check every cavity every hour for the correct loading position of the gob. But the ‘eye method’ is not accurate and also not consistent, as operators do not have much time for checking the position of the gob. As a result, critical defects are produced regularly.
With GA, every position of the gob is measured automatically every five to 10 minutes and an alarm is given for each cavity with an off-centre loading postion. By correct usage, the adjustment of the loading position of the gob is a simple, easy and safe job for the operator and is consistent among all operators. An optimal 0.0 (‘bulls eye’ in figure 4) is reacheable for everyone. In this way, critical defects can be reduced significantly, if not eliminated altogether by prevention. Logically, this applies during a normal process but also after a deflector change or job change. Next to the effect on quality, there is also the effect on the efficiency of the forming process (eg less section jams and less defective materials).
The next part of XPAR Vision’s ‘Amazing discoveries’ series of articles in Glass Worldwide November/December 2015 will reveal latest learnings of the effect of loading parameters on the forming process in terms of efficiency and quality.

